Customizing
Overview
BH is extremely flexible and can be customized and extended to fit a user's needs. The first step to customizing the existing rules and settings is to create a bh_core.sublime-settings in your User folder. With this file you can override any of the settings or bracket rules. By changing these settings, you can add support for new languages, or change the look of highlighting, and much more.
Core Visual Settings
These are the settings related to the visual appearance of BH.
show_in_minimap
Shows highlighted brackets in the minimap. This will work with all highlight styles except underline; thin_underline has no issues.
    // Show brackets in the minimap.
    "show_in_minimap": false,
show_unmatched
Displays a special highlight for brackets that cannot be matched.
    // When only either the left or right bracket can be found
    // this defines if the unmatched bracket should be shown.
    "show_unmatched": true,
show_unmatched_exceptions
List of languages in which the show_unmatched option logic will be reversed.
    // Do the opposite of "show_unmatched" for the languages listed below
    "show_unmatched_exceptions": [],
content_highlight_bar
An experimental setting which can enable the display of a vertical bar that extends from the line containing the opening bracket to the line with the closing bracket. Takes a boolean of true or false. When align_content_highlight_bar is set to false, the bar will be shown on the first column regardless of indent level of the brackets. When align_content_highlight_bar is set to true, the bar will be aligned at the bracket indent level.
    // Experimental: Creates a visible bar at the beginning of all lines between
    // multiline bracket spans.
    "content_highlight_bar": false,
show_in_widgets
An experimental setting that enables bracket highlighting in widgets (panels etc.). By default, BH does not highlight any brackets in plain text which is what the majority of the widget text boxes are. Regex search boxes are not plain text and should get bracket highlighting.
    // Experimental: Allow bracket highlighter to search in widgets.
    // Most widgets use Plain Text which BH should ignore,
    // But regex find views views are usually regular expression
    // Which should be the only views to trigger BH.
    "search_in_widgets": false,
Output panels are widgets as well, but sometimes the widget flag gets removed from them (Sublime issue). So this flag may or may not affect the output panel depending on its state. If you are a developer and wish to ensure an output panel that is created by your plugin does not have bracket highlighting, you can set the following setting to the view as True: bracket_highlighter.ignore.
align_content_highlight_bar
Modifies the behavior of content_highlight_bar and draws the vertical content bar at the indentation level of the highlighted bracket, but there are some limitations:
-
The content bar cannot extend through an empty line unless the bar is on the first column. This is a limitation of the Sublime API. Empty lines will cause a gap in the bar.
-
The content bar will not be shown on a line where non-whitespace characters cross the bar.
    // Experimental: Align the content highlight bar at the bracket indent level
    "align_content_highlight_bar": false,
high_visibility_enabled_by_default
Enables high visibility mode by default. High visibility mode highlights not only the bracket but the content between as well, but it is disabled by default and must be toggled on to be used. This reverses the behavior and has it on by default. Takes a boolean true or false.
    // Enable high visibility by default when sublime starts up
    "high_visibility_enabled_by_default": false,
high_visibility_style
Modifies the styling of high visibility mode. The available options are solid, outline, underline, thin_underline, squiggly, and stippled.
    // High visibility style and color for high visibility mode
    "high_visibility_style": "outline",
high_visibility_color
Modifies the high visibility color. There are three types of settings you can use:
-
__default__is a special reserved value which will use the color set inbracket_styles. See Configuring Highlight Style for more info. -
__bracket__is a special reserved value which will inherit the defined color of the highlighted bracket. -
Any valid scope found in your color scheme.
    // Color for high visibility mode
    "high_visibility_color": "__bracket__",
Behavioral Settings
These settings affect the matching behavior.
match_only_adjacent
Causes BH to only match and highlight brackets when the cursor is adjacent to a bracket.
    // Match brackets only when the cursor is touching the inside of the bracket
    "match_only_adjacent": false,
bracket_outside_adjacent
Augments the matching behavior and will trigger matching when the cursor is adjacent to a cursor on the outside (not between the brackets).
    // Outside adjacent bracket matching
    "bracket_outside_adjacent": true,
block_cursor_mode
Experimental setting that modifies the bracket matching mode for block cursor. The bracket matching mode is one that makes a little more sense to some people in regards to the visual representation of block cursors. In this mode, brackets will match when the cursor is right before the bracket (or if using a block cursor, highlighting the character). So if you are someone that uses block cursors and find that toggling bracket_outside_adjacent still doesn't quite match brackets how you would like, you can give this setting a try. It has also been mentioned that this makes sense with Vim.
When this setting is enabled, bracket_outside_adjacent will be ignored.
    // Experimental: Special matching mode for block cursor.
    // Essentially, this provides a matching mode that makes a little more
    // sense to some in regards to the visual representation of block cursors.
    // This will ignore "bracket_outside_adjacent".
    "block_cursor_mode": false,
ignore_outside_adjacent_in_plugin
Ignores the bracket_outside_adjacent setting when running a plugin if the plugin sets no_outside_adj to null (null for JSON or None in Python).
    // When "bracket_outside_adjacet" is set, and a plugin command explicitly sets
    // "no_outside_adj" "None" instead of "true" or the default "false",
    // this value will be used.
    "ignore_outside_adjacent_in_plugin": true,
ignore_block_mode_in_plugin
Experimental setting that ignores the block_cursor_mode setting when running a plugin if the plugin sets no_block_mode to null (null for JSON or None in Python).
    // When "block_cursor_mode" is set, and a plugin command explicitly sets
    // "no_block_mode" to "None" instead of "true" or the default "false",
    // this value will be used.
    "ignore_block_mode_in_plugin": true,
bracket_string_escape_mode
Depending on the setting, BH will either match sub-brackets inside strings with traditional string escape logic, or it will match sub-brackets in strings with regex escape logic. Takes a string value of either regex or string.
    // Set mode for string escapes to ignore (regex|string)
    "bracket_string_escape_mode": "string",
search_threshold
Sets the search threshold. The search threshold determines how many characters BH will search through to find matching brackets before giving up. This setting only affects auto-matching and not on-demand calls from the command palette and menu. By default, this value is very conservative and can be increased. Keep in mind that a very large value may impact performance.
    // Character threshold to search
    "search_threshold": 5000,
ignore_threshold
Causes the search_threshold limit to be ignored. It is not advised to use this as very large files may cause a noticeable performance hit, but has been made available due to a number of requests.
    // Ignore threshold
    "ignore_threshold": false,
auto_selection_threshold
A numerical value which controls the maximum number of simultaneous auto-matched brackets that are allowed. This setting will not be considered when running on-demand calls via the command palette or menu.
    // Set max number of multi-select brackets that will be searched automatically
    "auto_selection_threshold" : 10,
kill_highlight_on_threshold
Completely kills highlighting when auto_selection_threshold is exceeded. When disabled, BH will just highlight up to the threshold limit.
    // Enable this to completely kill highlighting if "auto_selection_threshold"
    // is exceeded.  Default is to highlight up to the "auto_selection_threshold".
    "kill_highlight_on_threshold": true,
gutter_icons
Globally enable or disable gutter icons.
    // Global control of gutter icons.
    "gutter_icons": true,
no_multi_select_icons
Disables gutter icons when doing multiple selections.
    // Disable gutter icons when doing multi-select
    "no_multi_select_icons": false,
Popup Settings
Settings related to the new popup hints when brackets are offscreen.
show_offscreen_bracket_popup
Setting this will show a popup when the mouse hovers over a visible bracket and its matching pair is offscreen. The popup will show about 120 chars of context for every line shown. Additionally, if the offscreen bracket is located on a separate line, it will show an additional line(s) of context before and after. The context is shown in plain text, but the bracket will be emphasized by making the bracket bold and colorizing it with the your theme's keyword color. Character context, line context, and emphasis color can all be configured in the settings file.
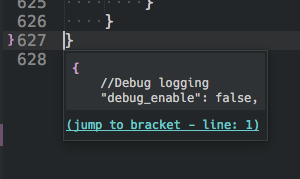

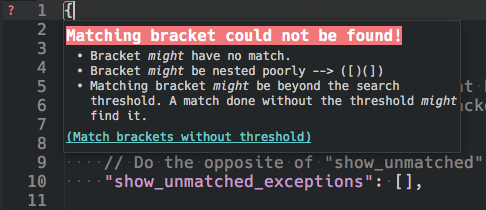
If a bracket was unmatched with an invalid highlight, you can mouse over it and will get the unmatched popup that explains the reasons why an unmatched bracket might occur. It also offers the option to attempt matching without the threshold.
    // Show hover popup
    // This will show a hover popup when mousing over
    // the visible bracket if the other
    // highlighted matching bracket is off screen.
    // It will show line text of the off screen bracket -/+ 128 chars
    // from the bracket start and end points.
    // A link will be available allowing the user to click and jump to
    // the other bracket.
    "show_offscreen_bracket_popup": false,
show_bracket_popup_always
If this setting is enabled with show_offscreen_bracket_popup, the bracket popup will always be shown on bracket hover, even if both brackets are onscreen.
    // If enabled with `show_offscreen_bracket_popup`,the popup will be shown
    // even if brackets are onscreen.
    "show_bracket_popup_always": false,
popup_char_context
This determines the amount of characters per line of context that are allowed in the popup that is generated by show_offscreen_bracket_popup. By default, this setting is set to 120. If you desire a different amount, you can specify it here.
    // Adjust char per line context of bracket popup.
    "popup_char_context": 120,
popup_line_context
Setting this determines the amount of additional lines of context that are allowed in the popup that is generated by show_offscreen_bracket_popup. popup_line_context is only applied to brackets that are not on the same line as the visible bracket. This value is split and half the lines will be gathered from before the line of interest and half from after the line of interest. It is recommend to use even numbers. Line context is a bit dynamic in the sense that if X number of lines cannot be gathered from before, the additional lines will be applied after; the inverse is true in regards to lines after.
    // Adjust number of lines of additional context
    // that are shown when brackets are vertically off screen.
    // Specified line count is split to context before and after the target line.
    // So a value of 4 would give you two lines of context before and two lines after.
    "popup_line_context": 2,
use_custom_popup_bracket_emphasis
This experimental setting allows you to override the default popup bracket emphasis which is calculated based on what scope/color you have assigned to the matched bracket style. With this setting enabled, you can use the setting popup_bracket_emphasis to control the color of the popup bracket emphasis. This will default to true if you don't have the MdPopups version which supports guessing the correct color.
    // Use 'popup_bracket_emphasis' to customize the popup's bracket emphasis color
    "use_custom_popup_bracket_emphasis": false,
popup_bracket_emphasis
This setting dictates what color is used to emphasize the off screen bracket in the popup that is generated by show_offscreen_bracket_popup. Colors can either be specified by a standard TextMate scopes (the popup library being used is MdPopups, and it scans your theme for standard TextMate scopes and creates the necessary CSS for the popups), or you can specify a hex color in the form of #rgb or #rrggbb. Due to limitations in Sublime's HTML renderer, scopes that define background colors will most likely not show the background color. The default setting is #ff0000.
Outside of the scopes generated by MdPopups, it is likely that your theme may have additionally included scopes. Sublime seems to include these by default (but your mileage may vary):
- error
- deleted
- success
- inserted
- warning
- modified
    // Specify the scope (to get color) to emphasize the off screen bracket
    // in popups.  Alternatively you can use a hex value in the form '#rgb' or '#rrggbb'.
    "popup_bracket_emphasis": "keyword"
Special Settings
debug
Turn on debug logging. Set to true to enable or false to disable.
    //Debug logging
    "debug_enable": false,
Tag Plugin Settings
This section covers settings found in bh_tag.sublime-settings. All tag settings are dictionaries. Each key represents a tag mode such as: html, xhtml, cfml, etc. All of these are exposed so that even non-standard HTML syntax can be supported.
Attention!
More tag mode keys can be added, but they must be added to every setting with valid parameters.
tag_mode
A list that contains a dictionary of different modes. Each mode tweaks the tag matching for the respective mode. Each entry in the list consists of a dictionary with the keys mode, syntax, and the optional first_line. mode specifies the mode name. syntax is a list of languages that are allowed in that mode. first_line (which is optional) is a regular expression that is applied to the first line in the file as a condition for selecting that mode. The tag_mode list is evaluated in order from top to bottom and selects the first entry that matches all the criteria.
    // Determine which style of tag-matching to use in which syntax.
    "tag_mode": [
        {"mode": "xml", "syntax": ["XML"]},
        {
            "mode": "xhtml",
            "syntax": [
                "HTML",
                "HTML 5",
                "PHP",
                "HTML (Jinja Templates)",
                "HTML (Jinja2)",
                "HTML (Rails)",
                "HTML (Twig)",
                "HTML (Django)",
                "laravel-blade",
                "blade",
                "Handlebars",
                "AngularJS",
                "Java Server Pages (JSP)"
            ],
            "first_line": "^[ \\t]*<\\?xml"
        },
        {
            "mode": "html",
            "syntax": [
                "HTML",
                "HTML 5",
                "PHP",
                "HTML (Jinja Templates)",
                "HTML (Jinja2)",
                "HTML (Rails)",
                "HTML (Twig)",
                "HTML (Django)",
                "laravel-blade",
                "blade",
                "Handlebars",
                "AngularJS",
                "Java Server Pages (JSP)"
            ]
        },
        {
            "mode": "cfml",
            "syntax": ["CFML", "HTML+CFML", "ColdFusion", "ColdFusionCFC"]
        }
    ],
tag_style
Sets the highlight style for the tag plugin. The string value should correspond to a style entry in bracket_styles. See Configuring Highlight Style for more info.
    // Style to use for matched tags
    "tag_style": {
        "xhtml": "tag",
        "html": "tag",
        "cfml": "tag"
    },
tag_scope_exclude
Excludes certain scopes from being evaluated when searching for tags.
    // Scopes to exclude from tag searches.
    "tag_scope_exclude": {
        "xhtml": ["string", "comment"],
        "html": ["string", "comment"],
        "cfml": ["string", "comment"]
    },
optional_tag_patterns
Specifies a regex pattern for names that will be evaluated as optional tags. Optional tags are tags whose closing tag is optional. In the case of optional tags, you may only have an opening (with no self closing slash). null can be used to specify that there is no pattern for the specified tag mode.
    // Optional closing HTML tags. You can use 'null' if it does not require a pattern.
    "optional_tag_patterns": {
        "xml": null,
        "xhtml": null,
        "html": "colgroup|dd|dt|li|options|p|td|tfoot|th|thead|tr",
        "cfml": "cf.+|colgroup|dd|dt|li|options|p|td|tfoot|th|thead|tr"
    },
void_tag_patterns
Specifies a regex pattern for names that never have a closing tag. Void or empty tags can optionally use the self closing slash: <tag />. null can be used to specify that there is no pattern for the specified tag mode.
    // Tags that never have a closing.  You can use 'null' if it does not require a pattern.
    "void_tag_patterns": {
        "xml": null,
        "xhtml": null,
        "html": "area|base|basefont|br|col|embed|frame|hr|img|input|isindex|keygen|link|meta|param|source|track|wbr",
        "cfml": "area|base|basefont|br|col|embed|frame|hr|img|input|isindex|keygen|link|meta|param|source|track|wbr"
    },
self_closing_tag_patterns
Specifies a regex pattern for tag names that can be represented in self closing form: <tag />. null can be used to specify that there is no pattern for the specified tag mode.
    // Self closing tags.  Single tags that are closed like this <tag />
    "self_closing_tag_patterns": {
        "xml": "[\\w:\\.\\-]+",
        "xhtml": "[\\w:\\.\\-]+",
        "html": null,
        "cfml": "cf.+"
    },
tag_name
Specifies the regex pattern for identifying the tag name for a given tag mode. This is broken out as a separate pattern because the Tag Attribute Select bh_plugin needs access to the tag name and tag attributes separate from the whole HTML tag regex.
    // Regex for tag name. Do not use capturing groups.
    "tag_name":
    {
        "xhtml": "[\\w:\\.\\-]+",
        "html": "[\\w:\\.\\-]+",
        "cfml": "[\\w:\\.\\-]+"
    },
attributes
Specifies the regex pattern for identifying the tag attributes for a given tag mode. This is broken out as a separate pattern so that because the Tag Attribute Select bh_plugin needs access to the tag_name and tag attributes separate from the whole HTML tag regex.
    // HTML attributes.  Do not use capturing groups.
    "attributes":
    {
        "xhtml": "[\\w\\-:]+(?:\\s*=\\s*(?:\"(?:\\.|[^\"])*\"|'(?:\\.|[^'])*'))?",
        "html": "[\\w\\-:]+(?:\\s*=\\s*(?:\"[^\"]*\"|'[^']*'|[^\\s\"'`=<>]+))?",
        "cfml": "[\\w\\-\\.:]+(?:\\s*=\\s*(?:\"[^\"]*\"|'[^']*'|[^\\s\"'`=<>]+))?"
    },
start_tag
Specifies the starting/opening tag regex. The pattern can accept the tag name and attribute portion of the pattern from the tag_name and attributes settings via the python string formatting variables tag_name and attributes (see example below).
    // Regex for start/opening tag.  Use a capturing group for tag name and self closing indicator '/' only.
    // Attributes and tag names are inserted using python string formatting:
    // the keyword 'attributes' and `tag_name` are used.
    "start_tag": {
        "xhtml": "<(%(tag_name)s)(?:\\s+%(attributes)s)*\\s*(/?)>",
        "html": "<(%(tag_name)s)(?:\\s+%(attributes)s)*\\s*(/?)>",
        "cfml": "<(%(tag_name)s)(?:(?:\\s+%(attributes)s)*|(?:(?<=cfif)|(?<=cfelseif))[^>]+)\\s*(/?)>"
    },
end_tag
Specifies the ending/closing tag regex.
    // Regex for end/closing tag.  Only use a capturing group for name.
    "end_tag": {
        "xhtml": "</([\\w\\:\\.\\-]+)[^>]*>",
        "html": "</([\\w\\:\\.\\-]+)[^>]*>",
        "cfml": "</([\\w\\:\\.\\-]+)[^>]*>"
    }
Swap Brackets Plugin Settings
Swappable brackets for a given language can be defined in bh_swapping.sublime-settings. Swap rules are found under the key swapping where swapping is an array of language swap rules.
    "swapping": [
        {
            "enabled": true,
            "language_list": ["C++", "C"],
            "language_filter": "allowlist",
            "entries": [
                {"name": "C/C++: #if", "brackets": ["#if ${BH_SEL}", "#endif"]},
                {"name": "C/C++: #if, #else", "brackets": ["#if${BH_SEL}", "#else\n${BH_TAB:/* CODE */}\n#endif"]},
                {"name": "C/C++: #if, #elif", "brackets": ["#if${BH_SEL}", "#elif ${BH_TAB:/* CONDITION */}\n${BH_TAB:/* CODE */}\n#endif"]},
                {"name": "C/C++: #ifdef", "brackets": ["#ifdef${BH_SEL}", "#endif"]},
                {"name": "C/C++: #ifdef, #else", "brackets": ["#ifdef${BH_SEL}", "#else\n${BH_TAB:/* CODE */}\n#endif"]},
                {"name": "C/C++: #ifndef", "brackets": ["#ifndef${BH_SEL}", "#endif"]},
                {"name": "C/C++: #ifndef, #else", "brackets": ["#ifndef${BH_SEL}", "#else\n${BH_TAB:/* CODE */}\n#endif"]}
            ]
        }
    ]
Each language rule contains the following attributes:
| Attribute | Type | Description |
|---|---|---|
enabled | bool | Specifies if the rule is enabled. |
language_list | [string] | An array of languages. |
language_filter | string | A string that specifies whether the language_list is either a allowlist or blocklist. |
entries | [dict] | An array of dictionaries, where each dictionary describes a type of bracket that can be swapped to. |
The entries key is used to define the related bracket swap rules for the given language. Each entry represents a bracket you can swap to.
| Entry | Type | Description |
|---|---|---|
name | string | The name of the entry as it will be seen in the command palette. |
brackets | [string] | An array consisting of a string that represents the opening bracket and a string that represents the closing bracket. |
Within the brackets key, you can specify where the cursor(s) will appear by using ${BH_SEL}. If you would like the selection to display text as a hint to what a user should enter in the selection, you can use ${BH_SEL:optional text}. You can also define tab stops that a user can tab through and enter text. The tab stop syntax is ${BH_TAB}. You can also define optional text within a tab stop to give the user a hint of what should be entered using the following syntax: ${BH_TAB:optional text}.
Wrap Brackets Plugin Settings
Wrapping brackets for a given language can be defined in bh_wrapping.sublime-settings. Wrap rules are found under the key wrapping where wrapping is an array of language wrap rules.
    "wrapping": [
        {
            "enabled": true,
            "language_list": ["Plain text"],
            "language_filter": "blocklist",
            "entries": [
                {"name": "{} Curly", "brackets": ["{", "}${BH_SEL}"], "insert_style": ["inline", "block", "indent_block"]}
            ]
        }
    ]
Each language rule contains the following attributes:
| Attribute | Type | Description |
|---|---|---|
enabled | bool | Specifies if the rule is enabled. |
language_list | [string] | An array of languages. |
language_filter | string | A string that specifies if the language_list is either a allowlist or blocklist. |
entries | [dict] | An array of dictionaries, where each dictionary describes a type of bracket that can be used to wrap the selection. |
The entries key is used to define the related bracket wrap rules for the given language. Each entry represents a bracket you can wrap the selection with.
| Entry | Type | Description |
|---|---|---|
name | string | The name of the entry as it will be seen in the command palette. |
brackets | [string] | An array consisting of a string that represents the opening bracket and a string that represents the closing bracket. |
insert_style | [string] | An array consisting of allowed insertion styles. Allowed insertion styles are: inline, block, and indent_block. Default is ['inline']. |
Within the brackets key, you can specify where the cursor(s) will appear by using ${BH_SEL}. If you would like the selection to display text as a hint to what a user should enter in the selection, you can use ${BH_SEL:optional text}. You can also define tab stops that a user can tab through and enter text. The tab stop syntax is ${BH_TAB}. You can also define optional text within a tab stop to give the user a hint of what should be entered using the following syntax: ${BH_TAB:optional text}.
Configuring Brackets
BH has been written to allow users the ability to define any bracket they would like to have highlighted. Bracket rules are defined with case insensitive regular expressions, syntax scoping, and bh_plugins. There are two kinds of brackets you can define.
-
scope_bracketswhich search the file for scope regions and then use regex to test for opening and closing brackets. -
bracketswhich use regex to find opening and closing brackets.
The brackets rules should usually be the preferred type. scope_brackets are usually used for brackets whose opening and closing are the same. These type are not easily distinguishable from one another by regex. Scope brackets must be contained in a continuous scope region like string for quotes etc.
BH uses a wrapper around Python's re regex library to add support for additional back references. See the Extended Regex Guide.
Tip
Brackets can be modified, or even added, without copying the entire bracket rule list to the user settings. See Bracket Rule Management for more info.
Configuring Brackets Rules
Brackets are defined under brackets in bh_core.sublime-settings.
angle and curly brackets will be used as an example (not all options may be shown in these examples):
        {
            "name": "angle",
            "open": "(<)",
            "close": "(>)",
            "style": "angle",
            "scope_exclude": ["string", "comment", "keyword.operator"],
            "language_filter": "allowlist",
            "language_list": ["HTML", "HTML 5", "XML", "PHP", "CFML", "HTML+CFML", "ColdFusion", "ColdFusionCFC"],
            "plugin_library": "bh_modules.tags",
            "enabled": true
        },
        {
            "name": "curly",
            "open": "(\\{)",
            "close": "(\\})",
            "style": "curly",
            "scope_exclude": ["string", "comment"],
            "scope_exclude_exceptions": ["string.other.math.block.environment.latex"],
            "language_filter": "blocklist",
            "language_list": ["Plain text"],
            "find_in_sub_search": "true",
            "ignore_string_escape": true,
            "enabled": true
        },
| Parameter | Description |
|---|---|
name | The name of the bracket (should be unique). |
open | Defines the opening bracket (one and only one capturing group must be present). |
close | Defines the closing bracket (one and only one capturing group must be present). |
style | Name of the style definition to be used to highlight the brackets. See Configuring Bracket Styles for more info. |
scope_exclude | Scopes where the opening and closing brackets should be ignored. |
language_filter | This works in conjunction with language_list. It specifies whether language_list is a blocklist or allowlist. |
language_list | An array of tmLanguage file names that should be avoided or included for highlighting. Looks to language_filter to determine if avoidance or inclusion is used. |
enabled | Disable or enable rule. |
scope_exclude_exceptions (optional) | Used to ignore excluding of sub scopes such as in the curly example above where string is excluded, but not string.other.math.block.environment.latex. |
plugin_library (optional) | Defines a plugin to use for determining matches (see Bracket Plugin API for more info on matching plugins). |
find_in_sub_search (optional) | This rule should be included when doing sub bracket matching in scope_brackets (like finding round brackets between quotes etc.). The setting must be a string and can be either true, false, or only; only means this bracket is only matched as a sub bracket of a scope_bracket. |
ignore_string_escape (optional) | Do not ignore sub brackets found in strings and regex when escaped, but use internal escape logic to determine if the brackets should be ignored based on whether regex or string escape mode is set. |
Configuring Scope Brackets Rules
Scope Brackets are defined under scope_brackets in bh_core.sublime-settings.
py_single_quote bracket will be used as an example (not all options are shown in this example):
        {
            "name": "py_single_quote",
            "open": "u?r?((?:'')?')",
            "close": "((?:'')?')",
            "style": "single_quote",
            "scopes": ["string"],
            "language_filter": "allowlist",
            "language_list": ["Python"],
            "sub_bracket_search": "true",
            "enabled": true
        },
| Parameters | Description |
|---|---|
name | The name of the bracket (should be unique). |
open | Defines the opening bracket (one and only one capturing group must be present). |
close | Defines the closing bracket (one and only one capturing group must be present). |
style | Name of the style definition to be used to highlight the brackets. See Configuring Bracket Styles for more info. |
scopes | Scope that should be searched to find the opening and closing brackets. |
language_filter | This works in conjunction with language_list. It specifies whether language_list is a blocklist or allowlist. |
language_list | An array of tmLanguage file names that should be avoided or included for highlighting. Looks to language_filter to determine if avoidance or inclusion is used. |
sub_bracket_search | Specifies whether this scope bracket also searches for sub brackets (like curly brackets in strings etc.). |
enabled | Disable or enable rule. |
plugin_library (optional) | Defines plugin to use for determining matches (see Bracket Plugin API for more info on matching plugins). |
Bracket Rule Management
In the past, BracketHighlighter required a user to copy the entire bracket list to the user bh_core.sublime-settings file. This was a cumbersome requirement that also punished a user because if they did this, they wouldn't automatically get updates to the rules as all the rules were now overridden by the user's settings file.
BracketHighlighter now lets you add or modify existing rules without overriding the entire rule set, or even the entire target rule. Let's say you have a custom language you want to have on your machine. Now, you can simply add it to one of the two settings arrays: "user_scope_brackets" and "user_brackets":
    "user_scope_brackets": [],
    "user_brackets": [
        {
            "name": "mylang",
            "open": "^\\s*\\b(if|subr|bytemap|enum|command|for|while|macro|do)\\b",
            "close": "\\b(e(?:if|subr|bytemap|enum|command|for|while|macro)|until)\\b",
            "style": "default",
            "scope_exclude": ["string", "comment"],
            "plugin_library": "User.bh_modules.mylangkeywords",
            "language_filter": "allowlist",
            "language_list": ["mylang"],
            "enabled": true
        }
    ],
Let's say you want to modify an existing rule, maybe just tweak the language list. All you have to do is use the same name of the item you want to change. Only that attribute will be overridden:
    "user_brackets": [
        // Angle
        {
            "name": "angle",
            "language_list": [
                "HTML", "HTML 5", "XML", "PHP", "HTML (Rails)",
                "HTML (Jinja Templates)", "HTML (Jinja2)", "HTML (Twig)",
                "CFML", "HTML+CFML", "ColdFusion", "ColdFusionCFC",
                "laravel-blade", "Handlebars", "AngularJS",
                "SomeNewLanguage" // <--- New language
            ]
        }
    ],
Let's say you want to insert a new rule between two rules. You can turn on debug mode and call the BracketHighlighter: (Debug) Filter Rules by Key, and then select position to see the current rule order and their position index. To turn on Debug mode, just add "debug_enable": true to your user settings file.
Example of BracketHighlighter: (Debug) Filter Rules by Key output:
[
    [
        {"name": "curly", "position": 0},
        {"name": "round", "position": 1},
        {"name": "square", "position": 2},
        {"name": "html", "position": 3},
        {"name": "cfml", "position": 4},
        {"name": "php_angle", "position": 5},
        {"name": "angle", "position": 6},
        {"name": "cssedit_groups", "position": 7},
        {"name": "ruby_embedded_html", "position": 8},
        {"name": "ruby", "position": 9},
        {"name": "c_compile_switch", "position": 10},
        {"name": "php_keywords", "position": 11},
        {"name": "erlang", "position": 12},
        {"name": "bash", "position": 13},
        {"name": "fish", "position": 14},
        {"name": "mylang", "position": 15}
    ],
    [
        {"name": "py_single_quote", "position": 0},
        {"name": "py_double_quote", "position": 1},
        {"name": "single_quote", "position": 2},
        {"name": "double_quote", "position": 3},
        {"name": "jsregex", "position": 4},
        {"name": "perlregex", "position": 5},
        {"name": "rubyregex", "position": 6},
        {"name": "mditalic", "position": 7},
        {"name": "mdbold", "position": 8}
    ]
]
Then you can specify the position you want to insert at using the position key:
    "user_scope_brackets": [],
    "user_brackets": [
        {
            "name": "mylang",
            "position": 4, // <-- New position
            "open": "^\\s*\\b(if|subr|bytemap|enum|command|for|while|macro|do)\\b",
            "close": "\\b(e(?:if|subr|bytemap|enum|command|for|while|macro)|until)\\b",
            "style": "default",
            "scope_exclude": ["string", "comment"],
            "plugin_library": "User.bh_modules.mylangkeywords",
            "language_filter": "allowlist",
            "language_list": ["mylang"],
            "enabled": true
        }
    ],
And if you run the debug command again, you will see that the position has changed:
        {"name": "curly", "position": 0},
        {"name": "round", "position": 1},
        {"name": "square", "position": 2},
        {"name": "html", "position": 3},
        {"name": "mylang", "position": 4}, // <-- New position
        {"name": "cfml", "position": 5},
        {"name": "php_angle", "position": 6},
This can be used to adjust the position of default rules from your user settings as seen in the overrides above.
So, unless you are forking BH to pull request a change to the default rules, you can now modify the rules in just these two settings without copying or touching the default rules. This will allow you to make changes, but still receive new updated rules.
    "user_scope_brackets": [],
    "user_brackets": [],
Configuring Highlight Style
Each bracket definition (described in Configuring Scope Brackets and Configuring Brackets) has a style option that you can assign a specific style to. The name of the style corresponds to a style definition. Style definitions are defined under bracket_styles in bh_core.sublime-settings. Normally you would override the existing style or add new styles through the user_bracket_styles instead of editing bracket_styles directly; direct editing of bracket_styles is mainly reserved for providing defaults to a user.
You can add and remove as many styles as you wish, but there are two special style definitions whose names are reserved: default and unmatched. If your remove them, they will be added back automatically in memory, but you can configure them. All styles, even the reserved styles, follow the same format. See description below:
    // Define region highlight styles
    "bracket_styles": {
        "default": {
            "icon": "dot",
            "color": "region.yellowish brackethighlighter.default",
            "style": "underline"
        },

        // This particular style is used to highlight
        // unmatched bracket pairs.  It is a special
        // style.
        "unmatched": {
            "icon": "question",
            "color": "region.redish",
            "style": "outline"
        },
        // User defined region styles
        "curly": {
            "icon": "curly_bracket",
            // "color": "region.purplish"
            // "style": "underline"
        }
    }
| Parameter | Description |
|---|---|
icon | Icon to show in gutter. Available options are: angle, round, curly, square, tag, star, dot, bookmark, question, quote, double_quote, single_quote, single_quote_offset, double_quote_offset, none. |
color | Scope to use that defines the color. |
style | Highlight style. Available options are: solid, outline, underline, none. ST3 has additional styles: thin_underline, squiggly, stippled. |
endpoint | Boolean to highlight just the beginning and end of bracket. This is useful for things like tags where it may be distracting highlighting the entire tag. |
As shown in the example above, an option can be omitted. If an option is omitted it will use the corresponding option in default. If for some reason you've modified default to not have all options, an internal default will be used. So curly, in this example, defines icon, but will use the default definition's color and style.
Clearing Up Color Misconceptions
Often I am asked why you can't just add a color directly like "color": "#D04321". This is not a decision made by me, but is a limitation of the Sublime API, specifically with region coloring, which is what BH uses to highlight brackets. Sublime needs a scope that exists in your color scheme file. It finds the rule regarding that scope, and applies the color specified in that rule.
Around Sublime build 3148, region-ish colors were added. These are scopes that get auto-generated for a color scheme (but can also be explicitly defined) that are meant to define a way for users to pick a specific color that corresponds to the color palette of the theme: region.redish, region.orangish, region.yellowish, region.greenish, region.bluish, region.purplish, and region.pinkish. BH by default uses these now in the color scheme where before it defined nothing, so if you are on Sublime 3148+, you should see colors.
If the color scheme creator has not explicitly defined a region-ish color for all the default region-ish colors, Sublime will guess a color that is close. If the palette of the color scheme is limited, you may get colors that don't make sense or situations where the same color is picked for colors that are close to begin with – like region.purplish and region.pinkish.
Example: Adding and Overriding Styles
To customize a color, style, or icon, you can simply override that specific style definition by placing your override in user_bracket_styles in your Packages/User/bh_core.sublime-settings file. You are also free to add new styles as well. Just and the key name you want to add/override and specify the options you want to explicitly define, and those specific options will override the existing rule or the defaults.
In this example, we will override the exiting curly and only change the color. We will continue to use the icon and style defined defined in the exiting curly rule. We've used the region-ish color region.bluish (for Sublime 3148+) to use the closes color Sublime can find to blue in the existing color scheme. We could have also used any other scope that the color scheme already has rules for.
"user_bracket_styles": {
    "curly": {
        "color": "region.bluish"
    }
}
If curly had not already been defined, curly would have been added to the existing rules and any options that were not specified would have inherited their value from the reserved default rule.
Example: Specifying Custom Colors in Schemes
If you are unsatisfied or unable to use region-ish colors, and are not satisfied with existing scope and color rules in your color scheme, you can modify your color scheme and add the scope and color you wish to use.
In Sublime 3152+, you can use the new color format to create an override color scheme instead of directly editing your color scheme. To append your new rule (or override an existing rule) you can create a .sublime-color-scheme file in your Packages/User folder. You only need to specify the colors you are explicitly adding or overriding. In this case, the scheme file would only contain the new scopes we want to append to the base color scheme file. In this case we are adding our own custom region called brackethighligher.curly and assigning a color of #CC99CC.
{
    "rules": [
        {
            "scope": "brackethighlighter.curly",
            "foreground": "#CC99CC"
        }
    ]
}
And now we can use our new scope:
    "user_bracket_styles": {
        "curly": {
            "icon": "curly_bracket"
            "color": "brackethighlighter.curly",
            // "style": "underline"
        }
    }
For Sublime builds <3152, you'd have to actually modify the existing color scheme (tmTheme) file that you are using and add your specific scope definition:
        <dict>
            <key>name</key>
            <string>Bracket Curly</string>
            <key>scope</key>
            <string>brackethighlighter.curly</string>
            <key>settings</key>
            <dict>
                <key>foreground</key>
                <string>#CC99CC</string>
            </dict>
        </dict>
Sublime Color Scheme Example
Assuming I was dissatisfied with using the built-in region-ish colors and wanted to create my own scopes (and was on a Sublime build that supports .sublime-color-scheme files), this is how you would it.
Override the bracket styles you want to apply a custom scope to (you can do some or all) by placing something similar in Packages/User/bh_core.sublime-settings:
// Define region highlight styles
{
    "user_bracket_styles": {
        "default": {
            "color": "brackethighlighter.default"
        },

        "unmatched": {
            "color": "brackethighlighter.unmatched"
        },

        "curly": {
            "color": "brackethighlighter.curly"
        },
        "round": {
            "color": "brackethighlighter.round"
        },
        "square": {
            "color": "brackethighlighter.square"
        },
        "angle": {
            "color": "brackethighlighter.angle"
        },
        "tag": {
            "color": "brackethighlighter.tag"
        },
        "c_define": {
            "color": "brackethighlighter.c_define"
        },
        "single_quote": {
            "color": "brackethighlighter.quote"
        },
        "double_quote": {
            "color": "brackethighlighter.quote"
        },
        "regex": {
            "color": "brackethighlighter.quote"
        }
    }
}
Then create an override .sublime-color-scheme file in Packages/User named <schme name to override>.sublime-color-scheme. Then add the scopes rules you are adding/overriding in the color scheme:
{
    "rules": [
        {
            "scope": "brackethighlighter.default",
            "foreground": "#CC99CC"
        },
        {
            "scope": "brackethighlighter.unmatched",
            "foreground": "#F2777A"
        },
        {
            "scope": "brackethighlighter.curly",
            "foreground": "#CC99CC"
        },
        {
            "scope": "brackethighlighter.round",
            "foreground": "#FFCC66"
        },
        {
            "scope": "brackethighlighter.square",
            "foreground": "#6699CC"
        },
        {
            "scope": "brackethighlighter.angle",
            "foreground": "#F99157"
        },
        {
            "scope": "brackethighlighter.tag",
            "foreground": "#66CCCC"
        },
        {
            "scope": "brackethighlighter.c_define",
            "foreground": "#F99157"
        },
        {
            "scope": "brackethighlighter.quote",
            "foreground": "#99CC99"
        }
    ]
}
Pre Sublime Color Scheme Example
Assuming I was dissatisfied with using the built-in scopes for styling bracket highlighting and wanted to create my own scopes (and was on a Sublime build before 3152), this is how you would it.
Override the bracket styles you want to apply a custom scope to (you can do some or all) by placing something similar in Packages/User/bh_core.sublime-settings:
// Define region highlight styles
{
    "user_bracket_styles": {
        "default": {
            "color": "brackethighlighter.default"
        },

        "unmatched": {
            "color": "brackethighlighter.unmatched"
        },

        "curly": {
            "color": "brackethighlighter.curly"
        },
        "round": {
            "color": "brackethighlighter.round"
        },
        "square": {
            "color": "brackethighlighter.square"
        },
        "angle": {
            "color": "brackethighlighter.angle"
        },
        "tag": {
            "color": "brackethighlighter.tag"
        },
        "c_define": {
            "color": "brackethighlighter.c_define"
        },
        "single_quote": {
            "color": "brackethighlighter.quote"
        },
        "double_quote": {
            "color": "brackethighlighter.quote"
        },
        "regex": {
            "color": "brackethighlighter.quote"
        }
    }
}
Then you'd need to modify the existing tmTheme file you are using (or create a copy and modify that). Just add the new scope rules in the appropriate place in the PLIST (real world example).
<dict>
    <key>name</key>
    <string>Bracket Tag</string>
    <key>scope</key>
    <string>brackethighlighter.tag</string>
    <key>settings</key>
    <dict>
        <key>foreground</key>
        <string>#66CCCC</string>
    </dict>
</dict>
<dict>
    <key>name</key>
    <string>Bracket Curly</string>
    <key>scope</key>
    <string>brackethighlighter.curly</string>
    <key>settings</key>
    <dict>
        <key>foreground</key>
        <string>#CC99CC</string>
    </dict>
</dict>
<dict>
    <key>name</key>
    <string>Bracket Round</string>
    <key>scope</key>
    <string>brackethighlighter.round</string>
    <key>settings</key>
    <dict>
        <key>foreground</key>
        <string>#FFCC66</string>
    </dict>
</dict>
<dict>
    <key>name</key>
    <string>Bracket Square</string>
    <key>scope</key>
    <string>brackethighlighter.square</string>
    <key>settings</key>
    <dict>
        <key>foreground</key>
        <string>#6699CC</string>
    </dict>
</dict>
<dict>
    <key>name</key>
    <string>Bracket Angle</string>
    <key>scope</key>
    <string>brackethighlighter.angle</string>
    <key>settings</key>
    <dict>
        <key>foreground</key>
        <string>#F99157</string>
    </dict>
</dict>
<dict>
    <key>name</key>
    <string>Bracket Quote</string>
    <key>scope</key>
    <string>brackethighlighter.quote</string>
    <key>settings</key>
    <dict>
        <key>foreground</key>
        <string>#99CC99</string>
    </dict>
</dict>
<dict>
    <key>name</key>
    <string>Bracket Unmatched</string>
    <key>scope</key>
    <string>brackethighlighter.unmatched</string>
    <key>settings</key>
    <dict>
        <key>foreground</key>
        <string>#F2777A</string>
    </dict>
</dict>
Bracket Plugin API
There are two kinds of plugins that can be written:
definitionplugins (plugins attached to bracket definitions via theplugin_libraryoption).run instanceplugins (plugins that are that are fed directly into the BracketHighligher command via the command parameterplugin).
Bracket plugins use BracketRegions.
class BracketRegion(begin_pt, end_pt)-
BracketRegionsare simple objects containing a begin pt and end pt of a bracket.Parameters:
Parameter Description begin_ptStarting point. end_ptEnding point. Attributes:
Attribute Description beginThe start point of the BracketRegion.endThe end point of the BracketRegion.Methods:
def size(self)- Returns size of region
def move(self, begin_pt, end_pt)-
Returns a new
BracketRegionobject with the points moved to the specified position.Parameters:
Parameter Description begin_ptStarting point. end_ptEnd Point. Returns:
Return Description BracketRegionBracketRegionwith new starting and ending points.
def to_region(self)-
Converts
BracketRegionto aSublimeRegion.Returns:
Return Description SublimeRegionA Sublime Region.
If needed, bracket plugins can be imported into each other in order to reuse functionality, but because they are not in Python's path, you need to use the special import method.
def import_module(module, attribute=None)-
Imports a
bh_pluginand returns the module or the module attribute ifattributeis defined.Parameters:
Parameter Description moduleThe desired module to import. For internal plugins, they are referenced by bh_modules.<plugin name>. For custom plugins, you should use the folder path relative toPackages. So if I had a plugin calledmyplugin.pyin myUser/bh_modulesfolder, I would useUser.bh_modules.myplugin.attributeThe attribute to import from the module.
Definition Plugins
These are plugins that are attached to the bracket definition and aid in processing the brackets. These kinds of plugins have three methods you can provide: post_match, compare, and/or validate.
validate
def validate(name, bracket, bracket_size, bfr)-
validateis run before comparing the bracket to its corresponding opening or closing partner. This is used to perform additional validation on a found bracket. For example, lets say you have a bracket that is case sensitive. BH uses a case insensitive search, so with validate, you can ensure the originally found bracket matches the desired case.Parameters:
Parameter Description nameThe name of the bracket definition being evaluated. bracketThe bracket region being validated. bracket_sideOpening (0) or closing (1) bracket. bfrThe file buffer. Returns:
Return Description Boolean Indicates whether the validation succeeded Trueor failedFalse.Example: Should match closing tag
endbut not matchEndcase Foo of Guard1 -> ok; Guard2 -> End endExample (from
lowercase.py):def validate(name, bracket, bracket_side, bfr): """Check if bracket is lowercase.""" return bfr[bracket.begin:bracket.end].islower()
compare
def compare(name, first, second, bfr)-
compareis run when comparing the opening bracket with the closing brackets. This allows you to provide logic to accept or reject the pairing of an opening bracket with a closing bracket. You should not change the text in the view during this operation.Parameters:
Parameter Description nameThe name of the bracket definition being evaluated. firstA bracket region for the opening bracket. secondA bracket region for the closing bracket. bfrThe file buffer. Returns:
Return Description Boolean Indicating whether the the comparison yields a suitable match. Example (from
phphekywords.py):def compare(name, first, second, bfr): return "end" + bfr[first.begin:first.end].lower() == bfr[second.begin:second.end].lower()
post_match
def post_match(name, style, first, second, center, bfr, threshold)-
post_matchis run after the brackets have been matched. You can do things like alter the highlighting region and change the bracket_style if needed. You should not change the text in the view during this operation.Parameters:
Parameter Description nameThe name of the bracket definition being evaluated. styleThe style definition name that is to be used to highlight the region. firstA bracket region for the opening bracket. secondA bracket region for the closing bracket. centerPosition (point) of cursor (in retrospect, probably not the most intuitive name – not sure why I named it this). bfrThe file buffer. thresholdThe calculated search window of the buffer that is being searched. Returns:
Return Description BracketRegionOpening bracket region. BracketRegionClosing bracket region. styleThe name of the style definition to use. Example (from
rubykeywords.py):import re def post_match(view, name, style, first, second, center, bfr, threshold): if first is not None: # Strip whitespace from the beginning of first bracket open_bracket = bfr[first.begin:first.end] if open_bracket != "do": m = re.match(r"^(\s*\b)[\w\W]*", open_bracket) if m: first = first.move(first.begin + m.end(1), first.end) return first, second, styleExample (snippet from
tags.py)def post_match(view, name, style, first, second, center, bfr, threshold): left, right = first, second threshold = [0, len(bfr)] if threshold is None else threshold tag_settings = sublime.load_settings("bh_core.sublime-settings") tag_mode = get_tag_mode(view, tag_settings.get("tag_mode", {})) tag_style = tag_settings.get("tag_style", "angle") bracket_style = style if first is not None and tag_mode is not None: matcher = TagMatch(view, bfr, threshold, first, second, center, tag_mode) left, right = matcher.match() if not matcher.no_tag: bracket_style = tag_style return left, right, bracket_style
highlighting
def highlighting(view, name, style, right)-
highlightingis the last hook that gets run. This is at a point when BH no longer cares about what the actual bracket region is, so it is safe to modify it for highlighting purposes. The view really shouldn't be modified here.Parameters:
Parameter Description viewThe current view containing brackets. nameThe name of the bracket definition being evaluated. styleThe style definition name that is to be used to highlight the region. leftA bracket region for the opening bracket (could be None).rightA bracket region for the closing bracket (could be None).Returns:
Return Description BracketRegionOpening bracket region. BracketRegionClosing bracket region. Example (snippet from
tags.py)def highlighting(view, name, style, left, right): """ Highlight only the tag name. """ if style == "tag": tag_name = '[\w\:\.\-]+' if left is not None: region = view.find(tag_name, left.begin) left = left.move(region.begin(), region.end()) if right is not None: region = view.find(tag_name, right.begin) right = right.move(region.begin(), region.end()) return left, right
Run Instance Plugins
Run instance plugins are manually invoked bracket matching with an attached plugin. The plugin itself is executed after a match is made. When defining a manually invoked BH command, either bh_key or bh_async_key should be used (key referring to key binding, but is also used for the menu and command palette). It may be misleading as to what bh_async_key means, but it is mainly a workaround to launch BH keys from the command palette. The command is kicked off asynchronously to ensure the palette closes before executing, but the BH command itself is still synchronous.
Example of run instance plugin getting called:
// Go to left bracket
    {
        "caption": "BracketHighlighter: Jump to Left Bracket",
        "command": "bh_key",
        "args":
        {
            "lines" : true,
            "plugin":
            {
                "type": ["__all__"],
                "command": "bh_modules.bracketselect",
                "args": {"select": "left"}
            }
        }
    },
The args parameter is a dictionary.
| Parameter | Description |
|---|---|
lines | Show the number of lines between the matched brackets in the status bar. |
no_outside_adj | This is a parameter used to tell the plugin to ignore the bracket_outside_adjacent setting. This is by default used for the bracketselect commands to ignore outside adjacent matching so it can do expanding selections or jump to parents brackets. The default is false when not defined, but it can be set to true or null in JSON (it would be None if defined directly in Python code). When null, the value will be read from ignore_outside_adjacent_in_plugin setting in the bh_core.sublime-settings file for convenient altering of the behavior. |
plugin | Configuration for the plugin to be used. |
The plugin parameter is a dictionary that contains 3 arguments that define which plugin should get run, under which circumstance it is run, and with what parameters it is run with.
| Parameter | Description |
|---|---|
type | An array containing the bracket definition names that the plugin should be run on. If type is not set, ['__all__'] will be used signifying all bracket definitions. |
command | The plugin to run. For internal plugins, they are referenced by bh_modules.<plugin name>. For custom plugins, you should use the folder path relative to Packages. So if I had a plugin called myplugin.py in my User/bh_modules folder, I would use User.bh_modules.myplugin. |
args | A dictionary containing the arguments to feed into the plugin. |
You create run instance plugins by deriving a class from the BracketPluginCommand class. Then you provide a method called plugin that returns the class.
class BracketPluginCommand()-
Attributes:
Attribute Description viewThe sublime view containing the bracket (don't change this). leftA bracket region for the opening bracket (can be changed). rightA bracket region for the closing bracket (can be changed). selectionAn array containing the selection that triggered the match (can be changed). refresh_matchA plugin can set this to trueif the plugin has moved the cursor in such a way that the current highlighted match is no longer valid. This will cause BH to setup another match when idle. An example of this is in thebracketselectbh_plugin; the cursor can be moved outside the matching brackets requiring a refresh to match the parent when the command is complete.nobracketThis was added mainly for sub-bracket matching (a bracket inside other brackets like round brackets in quotes/strings). This is set to true if the plugin has caused both left and right brackets to be returned as Noneand it is not desired to fall back and match the parent.Methods:
def run(edit, name, <args>)-
Parameters:
Parameter Description editThe sublime edit object. nameThe bracket definition being evaluated.
Example (from
foldbracket.py):import BracketHighlighter.bh_plugin as bh_plugin import sublime class FoldBrackets(bh_plugin.BracketPluginCommand): def run(self, edit, name): content = sublime.Region(self.left.end, self.right.begin) new_content = [content] if content.size() > 0: if self.view.fold(content) == False: new_content = self.view.unfold(content) self.selection = new_content def plugin(): return FoldBrackets